Plastiliq ImageResizer allows you to batch–resize and convert your images in just one click with maximum comfort.
Contents
Key features:
Convert images
Support of many popular image formats: JPEG, JPG, PNG, BMP and TIFF.
Resize images
7 useful modes including Width and Height, Width, Height, Percentage, Fit and Desktop.
Improved drag & drop
Support for drag & drop for files and folders (including subfolders). Support for drag & drop for files shortcuts and folders shortcuts.
Easy–to–use
Drag & drop mouse operations, image previews, tooltips and other useful features.
Quick start
See our compact and illustrated User Guide for more details.
Runs on Microsoft Windows
Runs on Windows (32/64-bit).
- Windows XP.
- Windows Vista.
- Windows 7.
Screenshots:
1.2.5 for Windows
1.20 MB
History of changes
Version 1.2.5 (Release date: 2012/01/28)
- Improved resize speed.
- Improved user interface.
- Improved installer.
- Improved translation file structure.
Version 1.2.3 (Release date: 2011/09/06)
- Improved user interface.
Version 1.2.2 (Release date: 2011/07/14)
- Improved installer.
- Fixed window focus problem.
Version 1.2.0 (Release date: 2011/07/4)
- Improved installer.
Version 1.1.0 (Release date: 2011/03/16)
- Improved resize speed.
- Reduced memory usage.
Overview (User Guide)
Plastiliq ImageResizer is your effective tool for resizing and converting images of the most popular formats.
You can refer back to the SecuredYou website for any help or support if you are experiencing any issues. Otherwise please contact us and we will respond to you shortly. We also recommend you try our PixelPicker to pick any color from your screen.
How do I use ImageResizer?
It’s simple.
- Select images.
- Specify and configure the appropriate Mode.
- Specify the format for converted images.
- Specify the folder for converted images.
- Click Resize.
Details
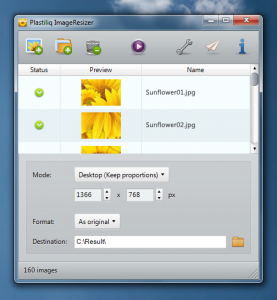
1. Uploading images
You can select images by clicking on “Add images” or “Add folder” from the main toolbar. Or you can simply drag images / folders into the ImageList or double-click on the empty ImageList.
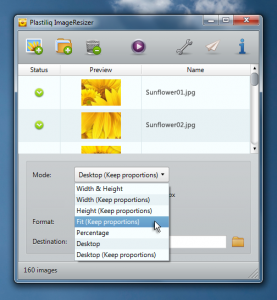
2. Mode selection
Width & Height
Specify the desired width and height of the image in pixels. Use this mode when you know exactly the size of images you want.
Width (Keep proportions)
Specify the desired width of the image, and the program will automatically adjust the height according to the aspect ratio.
Height (Keep proportions)
Specify the desired height of the image, and the program will automatically adjust the width according to the aspect ratio.
ALSO CHECK: 10+ HD Themes for Windows 10 you cannot miss.
Fit (Keep proportions)
The image will be adjusted to fit the specified area while preserving image proportions. This Mode can be used to create thumbnails.
Percentage
Specify the desired width and height in percentage of the original size. Use this mode only for converting images by entering 100 in both fields.
Desktop & Desktop (Keep proportions)
The image will be stretched to the size of your desktop. Use mode Desktop (Keep proportions) if you want to preserve image proportions (the background will be painted black).
3. Image file format
Click on the dropdown list and select your desired format (JPG, PNG, BMP, TIFF). If you prefer to keep the original file format, select “As original”.
4. Destination folder
Destination folder is a folder where you save converted images. To select a destination folder, click on the icon to the left of the Destination field, or drag the folder icon into the Destination field or double-click on the empty Destination field.
5. Resize
To start processing your images, click Resize on the main toolbar. The progress window will show the preview of the image which is being processed. The status information for each image is updated as soon as resizing is complete allowing you to monitor the progress. Once all images are processed you can review them in the Destination folder.
ALSO CHECK: Default Photo Viewer App Alternative for Windows (Must Try).
Tips & tricks. Shortcuts.
Contains all uploaded images. Right click on the image to bring up the context menu that allows you to delete the image from the list, open a folder or show / hide columns in the table.
The “Status” column shows the result of the last image processing.
Mouse over the image to view more information on the original image.
- Double-click on the empty ImageList to open the Add Image dialog.
- Double-click on the image row to open the image in the default image viewer.
- Alt + Double-click on the image row to open the processed image from the Destination folder.
- Right-click on the small Destination icon to open Destination folder in Explorer.
- When loading a large number of images, you can speed the process up by hiding the image preview column.
- You can sort the columns by name/path or image status.
Plastiliq ImageResizer Free Download for Windows 10, 8, 7
Version: v1.2.5
")
")
")
")

 – Free Documents Tool")